この投稿は、弊社が提供するWESEEK TECH通信の一環です。
WESEEK TECH通信とは、WESEEKのエンジニアがキャッチアップした技術に関する情報を、techブログを通じて定期的に発信していくものです。
はじめに
こんにちは!WESEEKインターンの宮沢です。今回の記事ではJavascriptのライブラリであるSocket.ioを用いて簡単なチャットアプリを作ってみたいと思います。
Socket.ioとは
公式ドキュメントによると、「あらゆるプラットフォームに対応した双方向・低レイテンシー通信(執筆者訳)」とあります。Socket.ioは、主にWebsocketを使って動作します。Node.js上で動作するサーバーサイドライブラリ、ブラウザ上で動作するクライアントサイドライブラリが提供されています。
WebSocketはサーバー・クライアント間をイベント駆動で双方向に通信を可能にする技術です。Web通信と言えばHTTPというプロトコルをよく耳にすると思います。これは1つのコネクションで1つのリクエストしか送ることができないため、新しい情報を取得するためにはページをリロードする必要がありました。チャットアプリやSNSなどリアルタイムに情報を取得したい場合これは不向きです。対してWebsocketはサーバーとクライアントが一度コネクションを行えばリアルタイムに情報のやりとりが可能になります。
今回はSocket.Ioの中でも基本的なメソッドである on() と emit() のみに絞ってご紹介します。
// サーバー
io.on("connection", (socket) => {
  // "hello" というイベントを発火させ、"world" という文字列を送信する
  socket.emit("hello", "world");
});

// クライアント
// "hello" というイベントを受信できるようにする
// 取得したメッセージを出力する
socket.on("hello", (message) => {
  console.log(message);
});
環境構築
チャットアプリを作成するにあたり、必要なライブラリのインストール、ファイル、ディレクトリを用意していきます。
下記のようなディレクトリー、ファイルを用意します。
simple_chat/
    ├── package.json
    └── src
        ├── index.html
        └── index.js
package.jsonには以下のように記述します。チャットアプリで必要になるライブラリ(expressとsocket.io)を"dependencies"に入れてあります。
{
  "name": "simple_chat",
  "version": "1.0.0",
  "main": "index.js",
  "license": "MIT",
  "dependencies": {
    "express": "^4.17.1",
    "socket.io": "^4.3.1"
  }
}
必要なライブラリーのインストールを行います。node、npm、yarnが自分の環境にインストールされている必要があります。
# simple_chatディレクトリに入る
$ cd simple_chat

# ライブラリーのインストール
$ yarn installsimple_chatディレクトリー配下に、node_modulesとyarn.lockが新たに追加されていることが確認できると思います。ひとまずこれでチャットアプリが作成できる状態になりました。
チャットアプリを作る
さっそくチャットアプリを作成していきます。
編集するファイルは以下の通りになります。
- index.js(サーバー)
- index.html(フロント)
まずはexpressを使ってサーバーを作成します。
index.js
const express = require('express');
const http = require('http');

const app = express();
const server = http.Server(app);

const PORT = 3000;

// ルーティングの設定。'/' にリクエストがあった場合 src/index.html を返す
app.get('/', (req, res) => {
  res.sendFile(__dirname + '/index.html');
});

// 3000番ポートでHTTPサーバーを起動
server.listen(PORT, () => {
  console.log(`listening on port ${PORT}`);
});
index.html
<html>
<body>
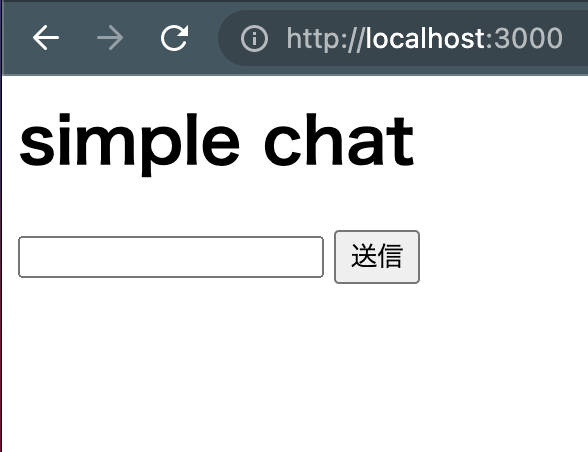
<h1>simple chat</h1>
<input id="inputText" type="text">
<input id="sendButton" type="submit">
<ul id="messageList" />
</body>
</html>ターミナルを開いてサーバーを起動します。
$ node src/index.js
サーバー側には listening on port 3000 というログが出力され、ブラウザで http://localhost:3000/ を開くと 以下のように表示されていると思います。
次にSocket.ioの処理を記述していきます。
index.js
const express = require('express');
const http = require('http');

// Socket.ioをインポート
const socketIo = require('socket.io');

const app = express();
const server = http.Server(app);

// 初期化
const io = socketIo(server);

const PORT = 3000;

app.get('/', (req, res) => {
  res.sendFile(__dirname + '/index.html');
});

server.listen(PORT, () => {
  console.log(`listening on port ${PORT}`);
});

// クライアントとのコネクションが確立したら'connected'という表示させる
io.on('connection', (socket) => {
  console.log('connected');
});
index.html
<html>
  <body>
    <h1>simple chat</h1>
    <input id="inputText" type="text">
    <input id="sendButton" type="submit">
    <ul id="messageList" />

    <!-- ライブラリの読み込み -->
    <script src="/socket.io/socket.io.js"></script>
    <script>
      // サーバーへ接続
      const socket = io();
    </script>
  </body>
</html>サーバーを再起動、localhost:3000にアクセスするとサーバー側のログにconnectedが出力されていると思います。
続いてクライアント側でinputにテキストを入力、送信ボタンを押すとサーバー側にメッセージを送信するイベントを作成します。
index.js
const express = require('express');
const http = require('http');
const socketIo = require('socket.io');

const app = express();
const server = http.Server(app);
const io = socketIo(server);

const PORT = 3000;

app.get('/', (req, res) => {
  res.sendFile(__dirname + '/index.html');
});

server.listen(PORT, () => {
  console.log(`listening on port ${PORT}`);
});

io.on('connection', (socket) => {
  console.log('user connected');

  // 'sendMessage' というイベント名で受信できる
  // 第一引数には受信したメッセージが入り、ログに出力する
  socket.on('sendMessage', (message) => {
    console.log('Message has been sent: ', message);
  });
});
index.html
<html>
  <body>
    <h1>simple chat</h1>
    <input id="inputText" type="text">
    <input id="sendButton" type="submit">
    <ul id="messageList" />

    <script src="/socket.io/socket.io.js"></script>
    <script>

      const socket = io();

      const clearText = () => {
        document.getElementById('inputText').value = '';
      }

      // 送信ボタンのクリックイベントを検知
      document.getElementById('sendButton').addEventListener('click', () => {

        // inputに入力されたテキストを取得
        let inputMessage = document.getElementById('inputText').value;

        if (inputMessage === '') {
          return;
        }

        // 'sendMessage' イベントを発火、メッセージを送信
        socket.emit('sendMessage', inputMessage);

        // input 内のテキストを空にする
        clearText();
      });
    </script>
  </body>
</html>
サーバーを再起動、localhost:3000にアクセスします。inputに適当な文字列を入力、送信ボンタンを押すとサーバー側に入力された文字列が出力されていると思います。
最後にサーバーから全てのクライアントに対して入力した文字列を表示できるようにします。
index.js
const express = require('express');
const http = require('http');
const socketIo = require('socket.io');

const app = express();
const server = http.Server(app);
const io = socketIo(server);

const PORT = 3000;

app.get('/', (req, res) => {
  res.sendFile(__dirname + '/index.html');
});

server.listen(PORT, () => {
  console.log(`listening on port ${PORT}`);
});

io.on('connection', (socket) => {
  console.log('user connected');
  socket.on('sendMessage', (message) => {
    console.log('Message has been sent: ', message);

    // 'receiveMessage' というイベントを発火、受信したメッセージを全てのクライアントに対して送信する
    io.emit('receiveMessage', message);
  });
});
index.html
<html>
  <body>
    <h1>simple chat</h1>
    <input id="inputText" type="text">
    <input id="sendButton" type="submit">
    <ul id="messageList" />

    <script src="/socket.io/socket.io.js"></script>
    <script>

      const socket = io();

      const clearText = () => {
        document.getElementById('inputText').value = '';
      }

      const addMessageList = (message) => {
        const ul = document.getElementById('messageList');
        const li = document.createElement('li');
        const text = document.createTextNode(message);
        li.appendChild(text);
        ul.appendChild(li);
      };

      document.getElementById('sendButton').addEventListener('click', () => {
        let inputMessage = document.getElementById('inputText').value;

        if (inputMessage === '') {
          return;
        }

        socket.emit('sendMessage', inputMessage);
        clearText();
      });

      //  'receiveMessage' イベントの発火を検知
      //  第一引数には受信したメッセージが入る
      socket.on('receiveMessage', (message) => {
        // 受信したメッセージをulタグに挿入
        addMessageList(message);
      });
    </script>
  </body>
</html>本記事冒頭のgifのような挙動になったら完成です!お疲れ様でした。今回扱ったソースコードは、githubに上げてあるので、クローンして気軽に立ち上げることができます。
参考にさせていただいた記事